Pages

Showing posts with label cake. Show all posts

Monday, August 19, 2013

Things You Must Try

During my hiatus, I haven't used my fancy camera one time.  Part of that is my frustration with not being able to quickly master it and part of it is just taking a much needed break.  As I tell my children, sometimes if you go away from something for a while, when you try again it's suddenly easier.  It's like clearing your brain, if you will.  I'm hoping that will happen with my photography skills.  I do know I don't practice often enough.  Again, something that I preach to my children almost daily.  Man this parenting thing sure does teach you a lot of what you're not doing as an individual!

Even though I don't have my own pictures, I've provided a link to the original photo to give proper credit.  Original pictures or not, I had to share some of our favorite recipes from the last couple of months.  There's a little something for everyone, I hope, so be inspired to try something new!

Let's start with dessert first, shall we?  I made this cake for my mom's birthday and it's one of my all-time favorites (and I've made a LOT of cakes!).  The only part I don't like is that you have to put the cake in the refrigerator to help set the whipped cream frosting in between the layers.  I just don't like the way the fridge dries out the crumb and makes it a little less moist, but even still the flavors of the cake make you forget about the texture of the cake.  She suggests Valencia oranges and after trying them, I second that suggestion. Navel oranges just don't have the powerful sweet orange taste like the Valencia ones.  She also talks about various butters and I used an Irish butter to give some extra richness to the cake.  Just don't use the cheap stuff and you should be good.  I didn't get a chance to do the fancy icing technique because I don't do artificial colors, but you should still watch her video of how she achieves such a beautiful pastel swirl.  It's almost too pretty to eat.  Almost.  
Orange Party Cake with Whipped Orange Frosting
via Sweetapolita

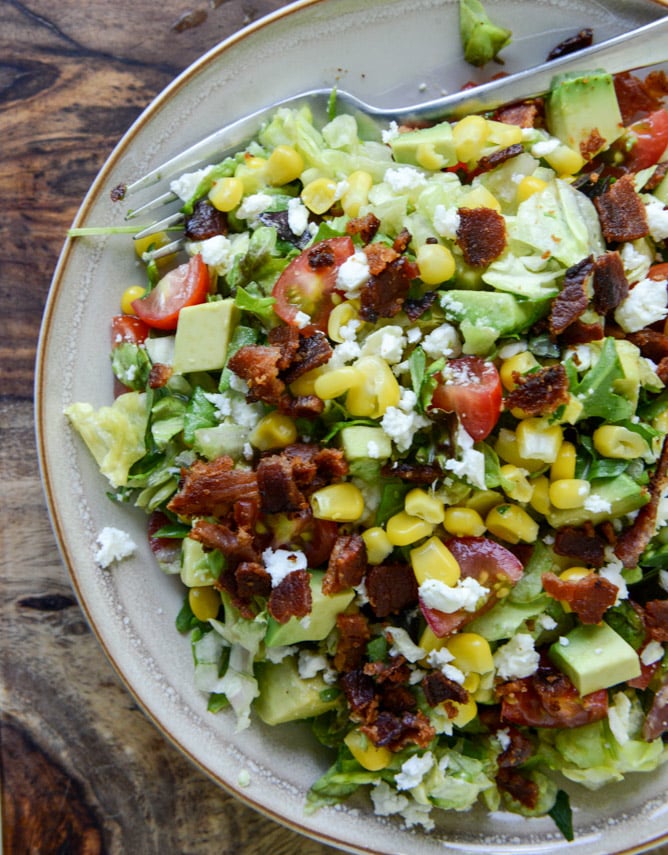
For a slightly healthier meal, might I suggest this BLT Chopped Salad with Corn, Feta & Avocado.  Seriously, it's everything I love all wrapped up in a giant bowl.  It's got both the crunch of the bacon and corn, as well as the creaminess of the avocado and feta.  Summer on a plate!

BLT Chopped Salad
via How Sweet It Is
Another delicious salad is this Thai Chopped Chicken Salad.  I omitted the edamame, but even without it was very filling and hearty.  I missed where the peanut sauce was supposed to be different from the dressing, so I just piled them all together in a mason jar and shook away.  I can't say what they taste like apart, but it's mighty tasty all blended together.

Thai Chopped Chicken Salad
via Taste and Tell
If you want to channel your inner-90 year old granny, this recipe for Homemade Chicken 'n' Dumplings is the way to go.  Seriously people, this is where it's at.  I have been dreaming of this big bowl of goodness ever since I made it nearly a month ago.  I made it as a surprise for Wes since he often feels our meals are too healthy (is there such a thing?!).  We were both pleasantly surprised how authentically awesome these dumplings were.  Now don't get discouraged that these are from scratch.  As Jenna points out, from start to finish this entire dish takes about 30 minutes.  You couldn't even park and get waited on at Cracker Barrel in that amount of time.  Plus as a bonus, you know what's in it (or not in it).  

Homemade Chicken 'n' Dumplings
via Eat, Live, Run
For a few vegetarian and vegan options, the next 4 are incredible!  I honestly couldn't pick a favorite because they're all great in their own right.  The French Onion Burger from the Curvy Carrot is full of flavor and one of the "meatiest" veggie burgers I've ever made.  It holds together well and doesn't smoosh into 100 pieces when you take the first bite.  The boys didn't even know it wasn't a traditional burger.  I served them on a pretzel roll from Trader Joe's and I'm now in love with those buns!  I'm a sucker for anything with caramelized onions, so this one had my name written all over it.  I couldn't lift the picture from her site.  Smarty pants!   

Wes requested a Bahn Mi type sandwich one week and even added that it could be vegetarian.  Not one to ignore a good challenge, I set off to find the best recipe.  And boy did I?!  There are many components to this sandwich, just as there are for a traditional Bahn Mi, but each one is an integral part of the overall goodness of the sandwich.  The mushroom pate would be great on a burger.  The only modification I'd make in the future would be to halve or even third the pickled vegetables.  They do keep for up to a month, but I had difficulties finding other uses for them.  I did enjoy the Daikon, as this was the first time I think I'd ever had one.  Crusty bread is another must to help absorb some of the wetness from the pate and veggies.  We went the egg route, as opposed to the tofu.

Vegetarian Bahn Mi Sandwich
via The Chubby Vegetarian
Another vegetarian meal that I would bet you wouldn't miss the meat is this hearty Chickpea Crockpot Pie with Biscuit Topping.  If you haven't noticed by now, we like bread.  Really it's me and I've passed on my affection to everyone else since I'm the cook.  These biscuits, although vegan, are the bomb!  I think the moisture from the crockpot helps a lot, as does the creamy broth and veggies sticking to the underside of each bite of the biscuit.  It's a match made in heaven.  Everyone was asking for seconds and were fighting for the leftovers.

Chickpea Crockpot Pie with Biscuit Topping
via Peas and Thank You

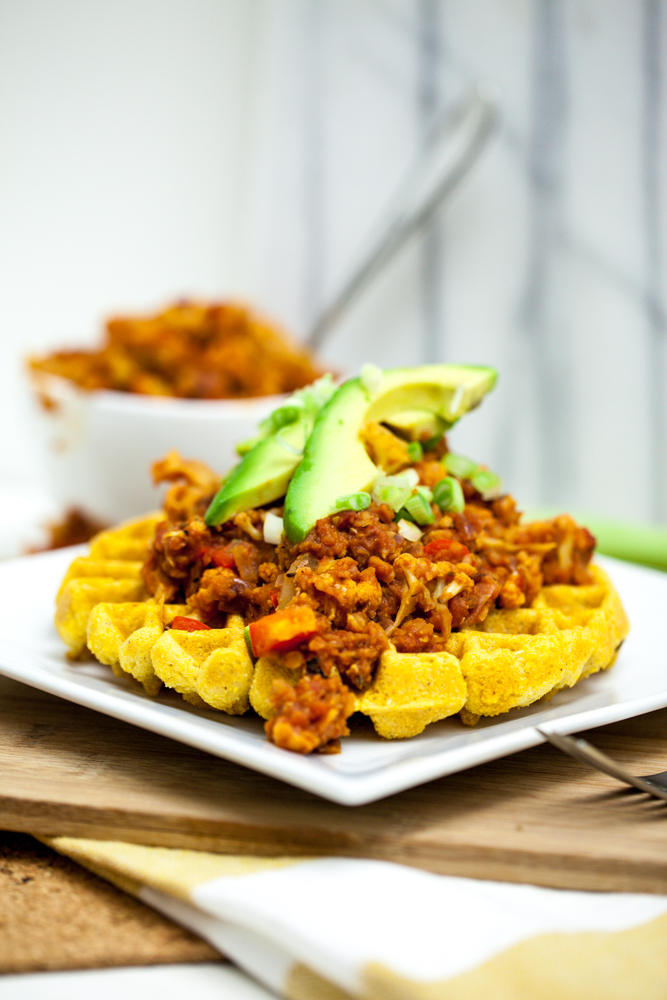
The last recipe may be a bit of a stretch for you.  Just trust me, it really it quite tasty.  Your kids will love that they get to eat a waffle and you'll love that said waffle is packed with nutrients.  Again, don't let the laundry list of ingredients overwhelm you.  Most of them are spices and all together it only takes about 30 minutes to prepare.  The cauliflower gets chopped up, so the mouths you are feeding are none the wiser that they're actually eating something healthy.  Honestly, I think I liked this one more than Wes, but he's funny on the texture of his food.  He needs some crunch in every meal and, well, this meal is lacking in that department.  He also doesn't like anything with the word "sloppy" in it because he said it automatically sounds unappealing.  I guess I see it.  The boys and I loved it though.

Cheesy Cornbread Waffles with Cauliflower Lentil Sloppy Joes
via Keepin' It Kind

Phew!  I'm hungry now.  Doing a big post like this makes me realize just how many meals have come out of my kitchen in the last 3 months.  Which one are you going to try first?  That is if you're not in a food coma by now!

 
Photobucket

Tuesday, April 16, 2013

Salted Caramel Chocolate Cake and Happy Birthday, Wes!

As I mentioned in my FYI Friday post, last Monday was Wes' birthday.  He's now not only older than me (well he always is) but now he's closer to 40 than he is 30.  That one hurts.  Not as much as I bet the big 4-0 will though!

I have a coworker who's birthday falls 2 days before his and I almost always bake her cake as well.  Year after year, Wes says he doesn't want me to make him a cake because I had to make hers, blah, blah, blah.  But who can have a birthday without cake?  That's sacrilegious!  So I donned my Betty Crocker apron and whipped up 2 cakes in 1 day.  That's how the big dogs do it.  I guess I'm officially a big dog.


I went with the old standby, one of our family favorites, a Salted Caramel Chocolate Cake.  I've made this about a half dozen times and each time it tastes slightly different than the last.  The key is all in the caramel.  You have to let it cook until you think it's reached the point of no return.  If you think it's burning, that's ok.  You're probably just reaching the finish line.  I've made it in the past when I didn't cook the caramel long enough and the icing lacked flavor.  Just seconds before the burning point, when it's deep golden brown, that's where it's at.


A terribly fuzzy picture of the birthday boy, but who could write a birthday post without so much as a blurry shot of the birthday boy himself?! 

Without further ado, the cake of all cakes, the lick-the-plate-clean-if-you're-a-2-or-5-year old, the cake that will add 5 pounds to your waistline and you won't care, the...


Salted Caramel Chocolate Cake

Ingredients:

For the cake:
2 cups sugar
1-3/4 cups all-purpose flour
3/4 cup HERSHEY'S Cocoa
1-1/2 teaspoons baking powder
1-1/2 teaspoons baking soda
1 teaspoon salt
2 eggs
1 cup milk
1/2 cup vegetable oil
2 teaspoons vanilla extract
1 cup boiling water

For the caramel:
4 tablespoons water
1 cup sugar
1/2 cup heavy cream
2 tablespoons butter
1/2 teaspoon lemon juice
1/2 teaspoon salt, kosher or sea

For the salted caramel icing:
1 1/2 sticks butter, at room temperature
8 ounces or 1 package of reduced fat cream cheese, at room temperature
2-3  cups powdered sugar
1 cup salted caramel


Directions:

For the cake:

1. Heat oven to 350°F. Grease and flour two 9-inch round baking pans.

2. Stir together sugar, flour, cocoa, baking powder, baking soda and salt in large bowl. Add eggs, milk, oil and vanilla; beat on medium speed of mixer two minutes. Stir in boiling water (batter will be thin). Pour batter into prepared pans.
3. Bake 30 to 35 minutes or until wooden pick inserted in center comes out clean. Cool 10 minutes; remove from pans to wire racks. Cool completely before frosting.
For the caramel:

1. Combine the water and sugar in a deep saucepan and cook over medium heat. Stir together with a wooden spoon until the sugar is incorporated. Cover the saucepan and let it cook over medium heat for 3 minutes.

2. After 3 minutes, remove the lid, increase the heat to medium-high, and bring to a boil. Do not stir from this point on, but it is important to carefully shake the pan so that one area of the caramel doesn’t burn. Continue to cook until the caramel turns an even amber color then remove from the heat and let stand for about 30 seconds.

3. Carefully and slowly pour the heavy cream into the mixture. The mixture will bubble up significantly. Stir the mixture and add the butter, lemon juice, and salt. Stir until combined.

4. Measure 1 cup into a Pyrex measuring cup. Stirring occasionally, allow to cool until thick like molasses and warm to the touch, about 20 minutes. This recipes makes slightly more than 1 cup of caramel. You can reserve the rest for drizzling, like I did if you wish, or just eat it with a spatula!

For the caramel icing:

1. Bring butter to room temperature by letting it sit out for 1 or 2 hours. Beat butter and cream cheese at medium speed until creamy.

2. Sift 1-2 cups of powdered sugar into the butter/cream cheese mixture and beat to combine. Add 1 cup of the salted caramel and beat to combine. Sift remaining powder sugar, in 1/2 cup increments and beating between each, until you arrive at the thickness and sweetness you desire. I used somewhere between 2-3 cups. 

3.  Frost in between the layers and all over the top and sides.

Store at room temperature for optimal freshness.  When you store cakes in the refrigerator, they dry out.  This cake will still taste delicious, the cake part just won't be as moist.


And for a little extra birthday bonus, some good old rough-housing with 2 of his favorite monsters!


**Linking up to What's Cookin Wednesday.

Photobucket

Tuesday, February 5, 2013

Peanut Butter Chocolate Chip Cake

I certainly didn't want you to think there were no sweets coming out of my kitchen!  I may be able to cut out meat, but I've yet to be able to kick the sugar habit.  I do try to limit my consumption to one sweet thing a day, but I realize even that is too much.  Darn it for tasting so deliciously sweet to my tongue!

I had a craving for cake, so I consulted my counterpart for his suggestion.  Being the unselfish person he is, he told me to pick something for me.  Awe, how sweet.  Yes, but I wanted to make sure I wasn't the only one eating an entire cake.  So I found this compromise.  We both like peanut butter and I was able to change up the icing to be more peanut butter-like, instead of the chocolate ganache.  

Although the cake wasn't as light and fluffy as I traditionally like, this was a good cake.  The peanut butter was present, probably in large part to the icing, and the chocolate chips didn't seem to get in the way of the consistency or taste.  The only change I would make would be to add a little more liquid and cook it slightly less than the recipe indicated (both of these changes have been accounted for in my recipe below).


{Print this!}
Peanut Butter Chocolate Chip Cake with Peanut Butter Frosting
inspired by:  Culinary Concoctions by Peabody
For the cake:

4 T unsalted butter
1 cup all purpose flour
1/4 tsp baking soda
1/4 tsp baking powder
1/4 tsp salt
1/2 cup tightly packed brown sugar
3 ounces creamy peanut butter (or any flavor nut you choose)
1 large egg
1 egg yolk
1/4 cup sour cream
1/4 cup hot water
1/2 tsp pure vanilla extract
1/2 cup dark chocolate chips

Directions:

Preheat oven to 325F.

Grease 2 8-or 9-inch round pans. Line the bottoms with parchment if you wish. Set aside.

Combine flour, baking powder, baking soda, and salt.

Mix together brown sugar, peanut butter and butter for two minutes. Add egg and egg yolk and mix for another 2 minutes. Scrape down the sides and mix for another minute.

Add half of the flour mixture and mix until incorporated, about 20 seconds. Then add the sour cream, mixing again for 20 seconds. Gradually add the remaining flour mixture.  Add the hot water in a slow, steady stream and mix on low to combine, about 30 seconds. Add the vanilla and mix for another 10 seconds. Add the chocolate chips and use a rubber spatula to finish mixing the ingredients until thoroughly combined.

Divide the cake batter into the prepared pan, spreading it evenly. Bake for about 22 minutes.  Remove from oven and cool for 5 minutes or so before removing from pans.  Let cool completely before frosting.

For the frosting:

4 oz reduced fat cream cheese, softened to room temperature
1 cup (or more) powdered sugar
2-3 T. peanut butter
1-2 T. almond milk (or dairy milk)
2 T. cocoa powder

Directions:

Blend cream cheese and peanut butter with electric mixer until combined.  Gradually beat in powdered sugar and cocoa.  You may need to add a couple tablespoons of milk to make the frosting creamy.  Taste for desired sweetness and add more powdered sugar if needed.  


**Linking up to Jam Hands and Buns In My Oven.
Photobucket